For the Automatic Magnetic Loop Tuner project I needed an SWR Bridge (Standing Wave Ratio) which could handle 200 W. The existing kit of http://www.kitsandparts.com/ could be used if I made some adjustments. Two capacitors and two resistors needed to be thrown away, two capacitors needed to be replaced, and more copper wire was needed then what was provided in the kit. With a price tag of $12 and shipping cost of $15, that’s a waste of money and resources.
Since the design isn’t that complicated, and I’m always interested in learning something new, I decided to make the SWR bridge myself.
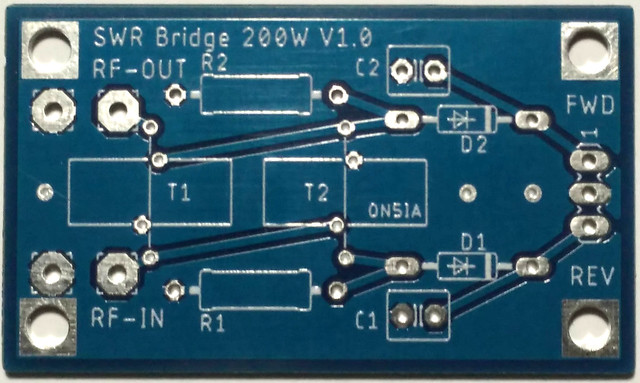
The SWR bridge is a tandem match, also known as a Sontheimer bridge. It’s named after it’s inventor, Carl G. Sontheimer.
I started to draw the electrical diagram in Eagle. Eagle, a part of Autodesk, from the creators of AutoCAD amongst other things, can be downloaded here for free. With the free full working version of Eagle you can design PCB’s (Printed Circuit Boards) with a maximum size of 80mm x 100mm and max 2 layers. More than enough for this little project.
When you are finished with the electrical diagram, you can start designing the PCB. It can be a real hassle if you’ve never done it. Fortunately there are a lot of people making tutorials on YouTube, describing how things should be done. I followed the three-part YouTube Eagle tutorial of Jeremy Blum.
Part 1: Schematic Design https://youtu.be/1AXwjZoyNno
Part 2: Printend Circuit Board Layout https://youtu.be/CCTs0mNXY24
Part 3: CAM output and DFM https://youtu.be/oId-h6AeXXE
You’ll need just a little over 90 minutes to watch the three of them. Jeremy explains how you can make your own PCB very well and guided me through the entire process.
Based on the Gerber files that are finally generated by Eagle during the CAM stage, you can ask your PCB manufacturer to produce your PCB. I must say I’m pretty happy with the result.
Now that I have the PCB, I only need to order the other components that need to be placed on it. I can’t wait to test this SWR Bridge and see how it performs.