Are you a ham radio enthusiast looking to enhance your Morse code (CW) experience? Look no further! I present to you my version of the open-source Arduino-based CW contest keyer, lovingly crafted by the brilliant K3NG. But wait, there’s more—my journey began with the hardware design inspiration from DJ0MY.
My Goal: To create a fully functional keyer that could be assembled entirely from parts sourced on AliExpress. Why? Well, as much as we appreciate the service from companies like DigiKey and Mouser, their prices can be a tad steep when you only need a handful of components. Plus, most of us hams already have a treasure trove of parts lurking in our (sometimes chaotic) “junk” boxes.
What Is the Nano Keyer?
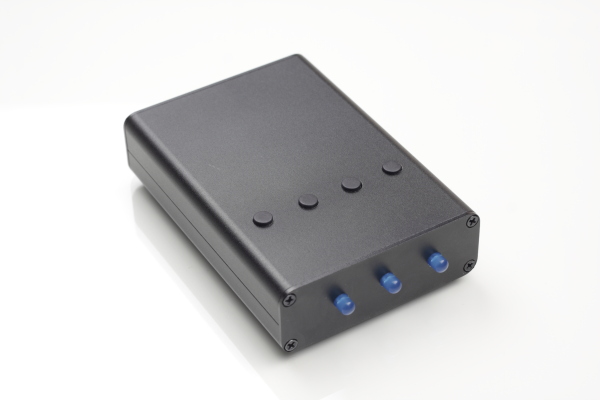
The Nano Keyer is more than just a gadget; it’s a bridge between tradition and modernity. With its compact form factor and Arduino heart, it combines the nostalgia of CW with the convenience of digital control. Whether you’re a seasoned contester or a newbie exploring Morse code, this little gem has something for everyone.
Key Features:
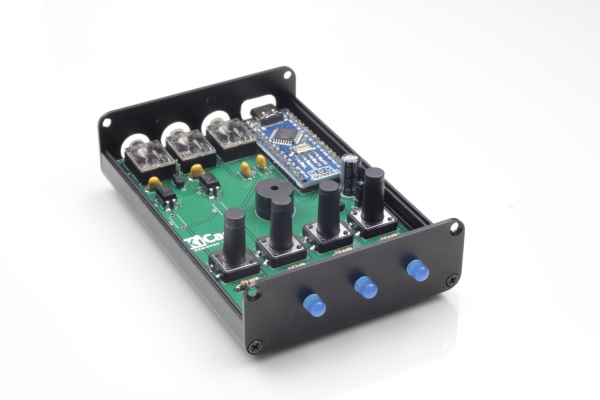
- Arduino-Based: The Nano Keyer leverages the power of Arduino, making it customizable and extensible. Tinkerers, rejoice!
- AliExpress Sourcing: No need to break the bank! AliExpress provides an affordable playground for our component scavenger hunt.
- Fully Functional: From straight key emulation to paddle support, the Nano Keyer covers all the bases. It’s like having a Swiss Army knife for CW.
Join Me on This Journey
In upcoming blog posts, I’ll dive deeper into the Nano Keyer’s assembly, programming, and practical usage. We’ll troubleshoot, share tips, and celebrate our victories. So dust off that soldering iron, locate your stash of resistors, and let’s embark on this adventure together!
Stay tuned for more updates. Happy keying!
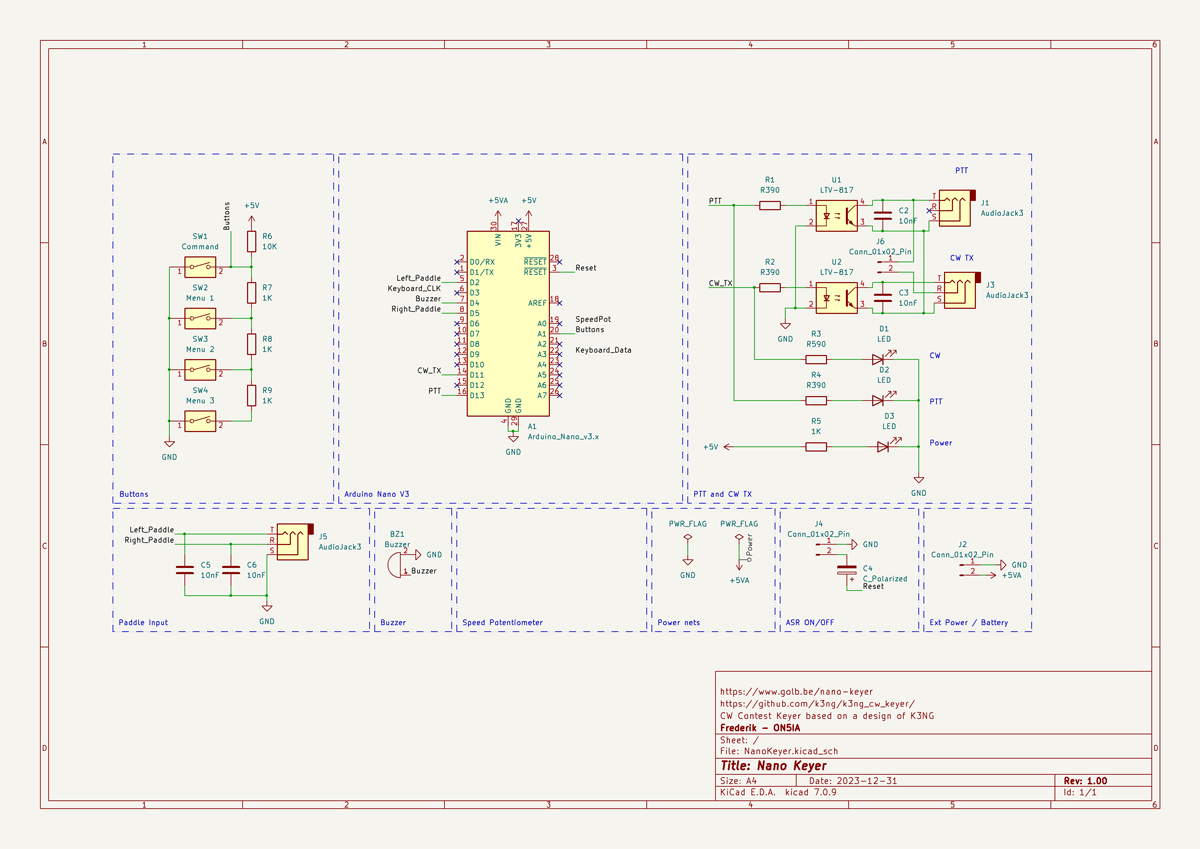
Schematic
Gerber files
Gerber files to order the PCB at JLCPCB.com to be uploaded when project is finished.
I still have 4 prototype PCB’s left that are free to a good home (you pay for the shipping).
These boards are functional, but in a next version the following thing will be changed:
- diameter of holes of the stereo socket will be changed from 1,3mm to 1,5mm
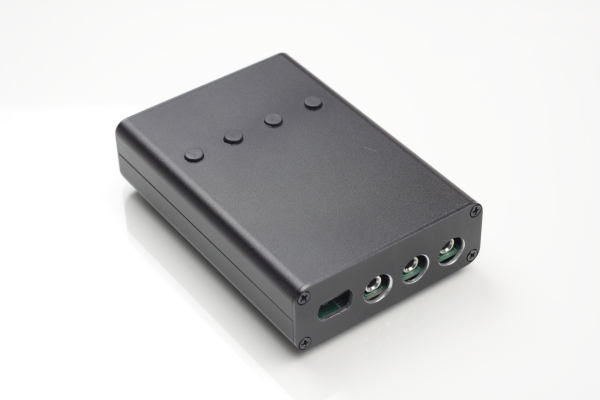
- stereo sockets and arduino nano will be moved much closer to the edge so they will stick out the exclosure (not possible with the usb-C version)
- PCB board size will be made 0,25 mm larger to make it a tighter fit in the enclosure
- footprint of the resistors will be made a little larger to make the resistors fit when bended with a standard bending tool
- better annotation / documentation on the silkscreen of the PCB
Parts sourced for this project
1 x Project box – 71x26x100mm – https://s.click.aliexpress.com/e/_DFK2buH
1 x Arduino Nano V3 – https://s.click.aliexpress.com/e/_DBrpbT3 – I took the USB-C version
3 x Audio Jack Connector – PJ-324 – https://s.click.aliexpress.com/e/_DlXiBwt – no screw version
3 x 5mm Led – https://s.click.aliexpress.com/e/_DEuDK9L
4 x 10nF Ceramic Disc Capacitor – https://s.click.aliexpress.com/e/_DDpzPB7
1 x 100V 10uF Aluminum Electrolytic Capacitor – https://s.click.aliexpress.com/e/_Dloh0tL
3 x 390R Resistor – https://s.click.aliexpress.com/e/_DCydu2l (2 are needed for the PC817c, the other is for the red led)
1 x 590R Resistor – https://s.click.aliexpress.com/e/_DCydu2l (Still need to double check the values of the resistors for the LED’s.)
4 x 1K Resistor – https://s.click.aliexpress.com/e/_DCydu2l (I used only blue leds, so 6 1K resistors were used)
1 x 10K Resistor – https://s.click.aliexpress.com/e/_DCydu2l
4 x Tactile Switch 12x12mm with long stem – https://s.click.aliexpress.com/e/_DDCFPQv – size 19mm
2 x PC817C Optocopler DIP4 – https://s.click.aliexpress.com/e/_DFIYyzF
1 x Buzzer – size to be confirmed
2 x 2 pin header male 2.54mm – https://s.click.aliexpress.com/e/_DdCqC0h
Some Pictures